Arrival at the same time as Yoimiya, Sayu is a 4 star character from Genshin impact from Inazuma, who wants to sleep more than fight, but is sure to be a warrior of choice for your team. Here's everything you need to know about the character, including its abilities, recommended sets, and whether or not to summon it.
Summary
Introducing Sayu

- Scarcity : ★★★★
- Element : Anemo (
 )
) - Poor : Two-handed sword
- Voiced : Suzaki Aya
- English voice actor : Lilypichu (Lily Ki)
- Birthday : October 19
- Arrival date Sayu banner : August 10, 2021
Official Description "Sayu is a ninja from the secret organization Shuumatsuban, whose greatest desire is to sleep soundly and grow. Eager to spend as much time as possible napping, Sayu has become adept at ninja art techniques of flight, camouflage, and transformation for this same reason. The use she makes of it might surprise you. »
Sayu Skills
Active Skills
- Normal Attack - Shuumatsuban Ninja Blade : Chains up to 4 sword strikes.
- Charged Attack : Performs a series of spinning attacks against nearby enemies; this attack consumes stamina continuously. The charged attack ends with a powerful hit.
- Yoohoo School – Fuuin Race : Curls into a Fuufuu Whirlwind, dealing Anemo damage to enemies it collides with at high speed, ending with a Fuufuu Kick that deals Anemo area damage.
- Single Press: Puts himself in a Fuufuu whirlwind form and rolls forward a short distance before executing his Fuufuu kick.
- Long press: Continually whirls Fuufuu, increasing resistance to Sayu's interruption. Sayu can control the direction she rolls, and using the skill again allows her to break out of this state and perform a more powerful Fuufuu kick. Long press of this skill can trigger elemental absorption. This skill has a maximum duration of 10s, and goes into cooldown when its effect ends. The longer Sayu stays in Fuufuu Whirlwind, the longer the cooldown.
- Elemental Absorption: If Sayu comes into contact with Hydro, Pyro, Cryo, and Electro elements while in Fuufuu Whirlwind, she gains the corresponding elemental attributes, and Fuufuu Whirlwind and Fuufuu Kick deal additional damage from Fuufuu. element absorbed. Elemental Absorption can only occur once during the skill's duration.
- Yoohoo School – Flurry of the mujina : Inflicts Anem damage to nearby enemies, and heals all nearby team characters with a PV amount proportional to Sayu's ATQ. Also invokes a Muji-muji Daruma.
- Daruma Muji-muji: At regular intervals, the Daruma Muji-muji acts in one of the following ways depending on the situation:
- When the HP of nearby characters is over 70%, the Daruma Muji-muji attacks a nearby enemy, inflicting Anemo damage.
- When a deployed character with 70% or less HP is nearby, the Daruma Muji-muji heals the nearby deployed character with the lowest percentage of HP by an amount of HP proportional to Sayu's attack. If no enemies are nearby and the characters are all over 70% HP, the Daruma Muji-muji also heals the characters.
- Daruma Muji-muji: At regular intervals, the Daruma Muji-muji acts in one of the following ways depending on the situation:
Passive Skills
- someone more efficient : When Sayu triggers a Dispersion, it heals the characters of the team as well as the nearby allied characters up to 300 HP. Sayu also recovers 1,2 additional HP for each of his Elemental Mastery points. This effect can be triggered once every 2 seconds.
- No work today! : Grants the Daruma Muji-muji summoned during Yoohoo School: Mujina's Flurry the following effects:
- When he heals a character, nearby characters are healed for 20% of the HP recovered by the character.
- The area of damage inflicted increases when attacking an enemy.
- Yoohoo School – Art of Silence : When Sayu is part of the team, your characters do not scare certain animals, such as the crystalline butterfly. To find out which animals are concerned, consult the "Miscellaneous" tab in the "Fauna" section of the Bestiary of the Archives.
Constellation
- Multitasking technique : The Daruma Muji-muji summoned by Yoohoo School: Mujina's Flurry ignores HP limits and can attack nearby enemies and heal characters at the same time.
- Out of my way ! : Yoohoo School: Fuuin Race gains the following effects:
- Fuufuu kick damage after a single tap increases by 3,3%;
- Fuufuu kick damage after long press increases by 3,3% for every 0,5 seconds spent in Fuufuu whirlwind, up to a max of 66%.
- Well, the clone takes care of it... : Yoohoo School skill level: Mujina's Gust +3.
- Revised and Improved Sloth : Sayu recovers 1,2 elemental energy when she triggers a Dispersion on the battlefield. This effect can be triggered once every 2 seconds.
- Speed first : Skill Level Yoohoo School: Fuuin Race +3.
- It's time for a good sleep : The attacks and healing of the Daruma Muji-muji summoned by Sayu during Yoohoo School: Mujina's Flurry increases with Sayu's elemental mastery level. Each elemental mastery point of Sayu grants the following effects:
- Increases DMG inflicted by Daruma Muji-muji's attacks by 0,2% of attack, up to 400% of max attack;
- Increases the HP healed by the Daruma Muji-muji by 3, up to a maximum of 6 HP.
How to play Sayu?
Sayu will look a lot like Bennett to most people, as his heal works much the same way. However, the character is also playable as a Sucrose, with good Scatter damage that is based on her high Elemental Mastery.
By playing well on Dispersion, especially with the charged elemental attack, Sayu is a support character who should do good damage not to be neglected, in addition to healing the deployed character. She also has the advantage of being very mobile, and of performing Dispersions throughout her roll., which is quite powerful (this is also why we will use our roll continuously, rather than a single press, despite the longer cooldown). We can then see her as a mix between Bennett and Jean, a 4-star character version.
Should he be summoned first on Yoimiya's banner? Not necessarily. Sayu is an excellent 4-star character it's true, but if you don't want to accidentally get Yoimiya, remember that Sayu will be back in other banners soon enough, but also that she will arrive in the general banner once the 2.0 update will be complete. If, on the other hand, you are aiming for the constellations of Sayu and you are interested in Yoimiya, the banner is interesting
Who to play Sayu with?
Sayu is a character who can easily fit into many compositions, because she heals the characters, but also causes Dispersion damage. We therefore recommend placing it with characters based on elementary skills:
- Ayaka
- Xiangling
- Bennett
- Klee
- Xing Qiu
- ganyu
- fischl
- Beidou
Best Sayu Gear
Which weapon for Sayu?
- Death of the Wolf (5 stars) : The claymore that goes on almost every character. Here, it will be used to increase Sayu's attack, which will be used for his healing.
- Pride of the Azure Vault (5 stars) : Especially in the case where Sayu is used for her healer role, because the energy recharge will allow her to use her elemental attack more often.
- Favonius Greatsword (4 stars) : Same principle as the previous weapon, but this time with a more accessible weapon.
- Ritual Greatsword (4 stars) : Very useful if you play a lot on Sayu's roll, which can be used a second time (especially with a high level of refinement).
- Bloody Sword (3 stars) ou Fluorescence (4 stars) : Weapons to be used only in very specific teams based on the elemental reactions that you can trigger. Not the best weapons, but they are still useful if you only have that.
Best set for Sayu
 Shadow of the Green Huntress (4 pieces): Like many Anemo characters, Sayu will favor this set to play with Dispersion (especially with his roll) to lower enemy resistance.
Which main stats to prioritize over accessories?
 hourglass : Elemental Mastery > ATK%
 Cut : Basic Mastery
 Headdress/Crown : Elemental Mastery > Healing Bonus
Which sub-stats first for Sayu?
- Basic mastery
- ATK
- Critical Rate / Energy Recharge (depending on role)
- Critical damage
Sayu Elevation and Abilities Materials
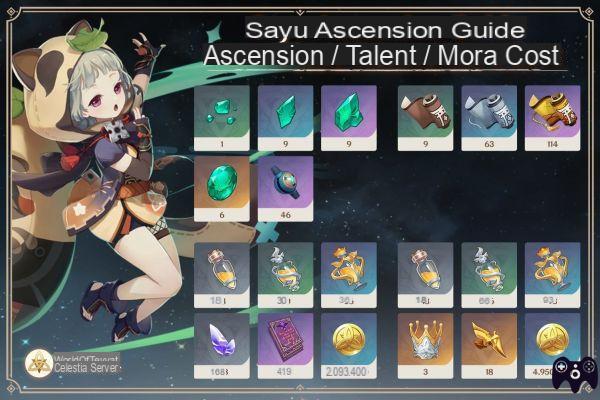
Sayu elevation materials
Here's everything you'll need to mount Sayu:
- 20 level : 1 x Vayuda Turquoise Shard / 3 x Crystal Marrow / 3 x False Flower Nectar / 20.000 moras
- 40 level : 3 x Vayuda Turquoise Fragment / 2 x Oni Mechanism / 10 x Crystal Marrow / 15 x False Flower Nectar / 40.000 moras
- 50 level : 6 x Vayuda Turquoise Fragment / 4 x Oni Mechanism / 20 x Crystal Marrow / 12 x Shimmering Nectar / 60.000 moras
- 60 level : 3 x Vayuda Turquoise Piece / 8 x Oni Mechanism / 30 x Crystal Marrow / 18 x Shimmering Nectar / 80.000 moras
- 70 level : 6 x Vayuda Turquoise Fragment / 12 x Oni Mechanism / 45 x Crystal Marrow / 12 x Elemental Nectar / 100.000 moras
- 80 level : 6 x Vayuda Turquoise Stone / 20 x Oni Mechanism / 60 x Crystal Marrow / 24 x Elemental Nectar / 120.000 moras
Sayu Skill Enhancement Materials
- Teaching / Guide / Philosophy of Light
- Deceitful / Shimmering / Elemental Flower Nectar
- Golden scale
If you want more advice, we refer you to the complete Genshin Impact walkthrough or simply go back to the index of our complete guide to all characters.